Step-by-Step: Editor Aide Operations
Discussion
To this point all the actions that can be taken to adjust the Test Definition directly within the Editor have been presented. These include:
-
Append Tasks to the Editor Test Definition.
-
Reconfigure Tasks in the Editor.
-
Clear the Editor of all Tasks
-
Remove the last (bottom-most) Task from the Editor Test Definition.
A fifth action - prepending a Task (adding a Task to the top of the Test Definition) - can be done by moving the Test Definition from the Editor to an alternative location, clearing the Editor, inserting the new Task and then restoring the original Tasks to the Editor. This action involves procedures that have not yet been discussed.
It is clear that operations in the Editor are limited. Actions that cannot be directly implemented include:
-
Removing a Task from the interior of a Test Definition.
-
Inserting a Task into the interior of a Test Definition.
-
Changing the position of a Task in the Test Definition.
The reason for these limitations relates to the (possibly multiple) dependencies between Tasks such as the Branch Task or Filters and Tasks preceding them in the Test Definition. For example, removing a Branch Target Task from a Test Definition will leave the Branch Task improperly configured. The solution to this problem is the Editor Aide tool.
For this set of steps, the Test Definition of the preceding "Test Definition & Editor" Step-by-Step topics will be adjusted by removing the Delay Task and inserting a Single-Point Filter Task that collects ±P* (µC/cm2) and ±P^ (µC/cm2) as a function of Branch Loop iteration. This may be of limited practical value, but serves to fully explore the Editor Aide tool.
Step-by-Step
Step 1: Open the Editor Aide tool. Select "Editor->Editor Aide" or right-click in the Editor window and select "Editor Aide" from the popup menu or click "Ed Aide" on the tool bar or press <Alt-A>.
Figure 1 - Access the Editor Aide Tool.
Step 2: Load the Editor Test Definition into the Editor Aide Editor List control. When the Editor Aide tool opens, click Load Editor Tasks To Editor List. The Tasks in the Editor will be copied into the Editor List. The Tasks in the Editor List will retain their configurations. Selecting a Task will update Task Name and Comments, along with Max. Voltage, Sample Area (cm2) and Sample Thickness (µm), if appropriate.
Figure 2a - Click Load Editor Tasks To Editor List.
Figure 2b - Editor List is Update. Collect/Plot Filter Task is Selected. Task Name and Comments are as Configured.
Step 3: Delete the Delay Task. Select the Delay Task in the Editor List and click Delete Selected. (Note that the Branch Task is selected after the Delay Task is deleted. However, the Task Name and Comments are not yet updated. To update Task Name and Comments, along with Max. Voltage, Sample Area (cm2) and Sample Thickness (µm), a Task must be deliberately selected with the mouse in Editor List.)
Figure 3a - Select the Delay Task and click Delete Selected.
Figure 3b - Delay Task is Removed.
Step 4: Append the Single-Point Filter Task to the Test Definition in Editor List. In Filter Tasks, select "Single-Point". Click Add Selected Task to Editor List.
Figure 4a - Actions to Add the Single-Point Filter Task to the Editor List.
Figure 4b - Single-Point Filter Task is Appended to Editor List Test Definition.
Step 5: Move the Single Point Filter Task into Position. With the Single-Point Filter Task selected in the
Editor List, click

once to move the Single-Point Filter Task up between the Collect/Plot Filter Task and the Branch Task. The Single-Point Filter Task could also be moved up again to before the Collect/Plot Filter Task. That is at the user's discretion. Note that
Task Name and
Comments could be assigned to the Single-Point Filter Task at this point. However, there will be a second opportunity, below.
Figure 5a - Click to Move the Single Point Filter Up in the Editor List.
Figure 5b - Single-Point Filter Task Position is Adjusted in the Editor List.
Step 6: Clear the Test Definition from the Editor window. The Test Definition in the Editor List is now ready to return to the Editor window. The action could be initiated immediately. However, the Tasks in the Editor List control would be appended to the Tasks already in the Editor window (Figure 6). Before initiating the Editor List move to the Editor, clear the Editor by clicking Clear Editor.
Figure 6 - Updated Test Definition Moved to Editor Without Clearing the Editor.
Figure 7 - Clear the Editor Window.
Step 7: Move the Editor List Test Definition into the Editor window. As the Editor List Test Definition is moved, each Task is opened for configuration. As it is closed it is appended to the Test Definition in the Editor. Click Move Editor List to Editor.
Figure 8 - Initial Editor List Test Definition Move to the Editor.
Configure the Tasks as follows:
-
PUND: Review the Task configuration. Make any desired changes. No specific action is required.
Figure 9 - Review and Adjust PUND Task Configuration.
-
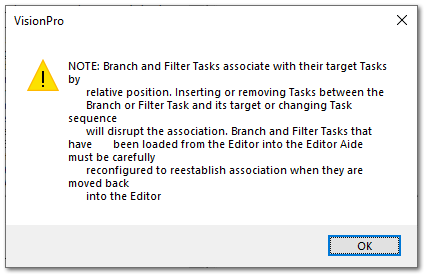
Collect/Plot Filter: Review the Task configuration and plot configuration. Make any desired changes. For Filter Tasks, although they may appear properly configured, it is important to re-establish the dependency with the Filter Target Task(s) by validating the selection in
Task Selector and clicking
Add Tasks. This is noted specifically in the subdialog accessed by
Critical Note on Branch and Filter Tasks (
Figure 10).
Figure 10 - Branch and Filter Task Reconfiguration Note.
Figure 11 - Validate and Register Target Task(s) Selection.
Figure 12 - Adjust Plot Labels and Configuration as Needed.
-
Single-Point Filter: The entire Task must be configure from scratch. In particular:
-
Task Name: Give a unique and meaningful identifier. The Task will be permanently archived under this name.
-
-
Single-Point X Axis Type: "Loop Count".
-
Single-Point Data: "P* (µC/cm2)", "P^ (µC/cm2)", "-P* (µC/cm2)" and "-P^ (µC/cm2)".
-
Add Data Trace(s): Click here after making the complete
Single-Point Data selection. The selection will be indicated with an appended " (X)".
-
Task Selector: Select one or more PUND Tasks. (For this set of steps there is only one.)
-
Add Task: Click here after making the Complete Task Selector selection. The selection will be indicated with an appended " (X)".
-
Comments: These are recommended, but not required. Extended text is available to allow detailed discussion of inclusion and configuration of the Task.
Figure 13 - Single-Point Filter Task Main Configuration.
The Single-Point Filter Task plot labels should also be meaningfully configured.
Figure 14 - Single-Point Filter Task Plot Configuration.
-
Branch Task: Review the Task configuration and plot configuration. Make any desired changes. For the Branch Task, although they may appear properly configured, it is important to re-establish the dependency with the Branch Target Task by validating the selection in
Task Selector and clicking
Add Tasks. This is noted specifically in the subdialog accessed by
Critical Note on Branch and Filter Tasks (
Figure 10).
Figure 15 - Branch Task Reconfiguration.
Step 8: Save the Editor List Test Definition to a file.
Figure 16 - Initial File Save - Click Browse to File.
-
Navigate to an appropriate output file location and specify the non-existant file name. The file will have a *.elx file extension. Click
OK.
Figure 17 - Navigate to the File Location and Assign the File Name.
-
The file path and name will appear in the unlabeled text box just below
Browse to File. Since the file does not exist,
Save Editor List to File is enabled and
Load Editor List From File is disabled. Click
Save Editor List to File to write the file. Then validate the file at the location. Since the file now exists,
Save Editor List to File is disabled and
Load Editor List From File is enabled.
Figure 18 - Write the Editor Aide Editor List File.
Step 9: Recall the Editor List from an existing file.
-
If required, click
Clear All to clear all Tasks out of the
Editor List. Otherwise, Tasks loaded from the file will be appended to existing Tasks in the
Editor List.
Figure 19 - Clear the Editor List.
-
Click
Browse to File. Use the standard Windows file browser dialog that appears to navigate to and select and existing *.elx file. Click
Save to close the browser. The file path and name will appear in the unlabeled text box just beneath
Browse to File. Since the file exists,
Save Editor List to File will be disabled and
Load Editor List from File will be enabled.
Figure 20 - Select the Existing Editor List File.
-
Click Load Editor List from File. The Tasks stored in the selected *.elx file will be appended to any Tasks in the
Editor List.
Figure 21 - Update the Editor List from the File.
Step 10: Click Close the Dialog No Further Action to close the Editor Aide.